When people think about a VPN, they usually start with privacy on public Wi-Fi or accessing geo-restricted content. My main use case is slightly different: reach my home network remotely and, when needed, send all of my phone or laptop Internet traffic through my house.
In practice, I want to:
- access local resources while away from home
- administer some services without exposing them directly to the Internet
- use my home connection as the Internet exit point from third-party networks
- keep the whole design simple, maintainable, and mobile-friendly
For this, WireGuard is a strong fit. It is easier to understand and maintain than many older VPN options, performs well, and integrates cleanly with OpenWrt.
This article is based on my setup:
- a Linksys MR8300 tested with OpenWrt 24.10.5
- the OpenWrt router is placed behind a Huawei ISP router
- remote access mainly from Android
The goal is to build a VPN setup that provides both:
- access to the LAN behind OpenWrt
- as well as full Internet routing through the house (
AllowedIPs = 0.0.0.0/0on the client side)
In this setup, WireGuard is not just a convenience feature. It provides remote access into the home network and should be treated accordingly.
If you only need the implementation steps, jump to Step 1.
Configuration summary
- LAN subnet:
192.168.10.0/24 - WireGuard subnet:
10.203.0.0/24 - Router WireGuard IP:
10.203.0.1 - Android WireGuard IP:
10.203.0.2 - WireGuard UDP port:
32541 - DDNS hostname example:
myprivatevpnXYZ.mmb.sh
What this setup does
This setup is designed for a home network where:
- the ISP router stays in place
- the OpenWrt router sits behind it
- one UDP port is forwarded from the ISP router to OpenWrt
- clients connect with WireGuard
- the VPN can provide both LAN access and full-tunnel Internet
This matters because many tutorials assume that the OpenWrt router is directly exposed to the Internet. That is not my case here.
Prerequisites for OpenWrt behind an ISP router
Before starting, I need:
- OpenWrt 24.10.5 installed on the router
- admin access to both OpenWrt LuCI and the Huawei HG8145X6
- the ability to create a UDP port forward on the ISP router
- a stable WAN IP for the OpenWrt router on the ISP side, ideally via DHCP reservation
- a plan for DynDNS or another way to reach the home connection if the public IP changes
- WireGuard packages installed on OpenWrt
On my router, I installed:
opkg update
opkg install kmod-wireguard wireguard-tools luci-proto-wireguard
These packages can also be installed directly from the LuCI interface through System > Software.
In that case, click Update lists… first, then filter packages with wireguard, and install them from the web interface.
The luci-proto-wireguard package is only needed if I want to manage the WireGuard interface and peers directly from LuCI. It is therefore not strictly required if the whole setup is done from the command line.
On my router, installing luci-proto-wireguard from LuCI also pulled in the other two required packages automatically.
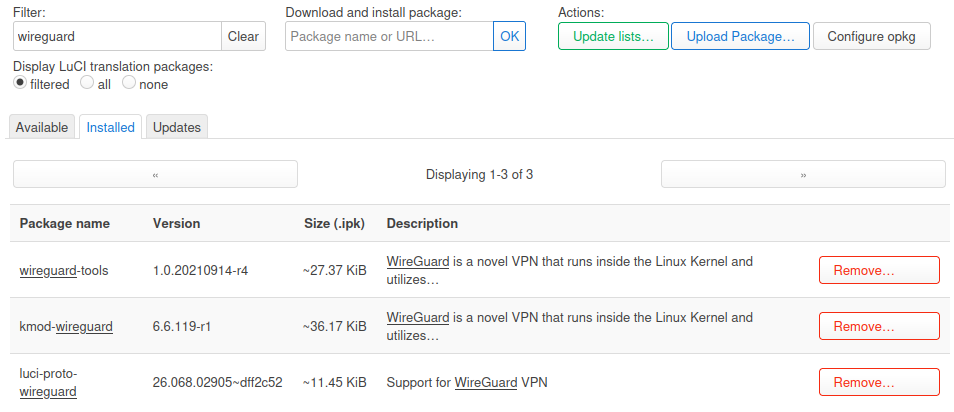
LuCI software page after clicking Update lists…, filtering for wireguard, and showing luci-proto-wireguard, kmod-wireguard, and wireguard-tools.
One practical detail: I had to reboot the router after installing the packages before the WireGuard protocol showed up in the LuCI interface creation dialog.
If WireGuard does not appear in LuCI after installation, I would first verify:
- that the packages are really installed
- that the kernel version matches
- and then simply that the router has been rebooted
Why use this instead of exposing services directly
If the goal is only to reach one internal service, the common temptation is to publish a port on the ISP router and access that service directly.
The problem is straightforward:
- every exposed service increases the attack surface
- access control becomes scattered
- Internet exposure and administrative access get mixed together
- ISP routers are often too limited to manage this cleanly
With a VPN, the model changes:
- a single entry point is exposed
- authentication relies on cryptographic keys
- LAN access can remain private
- remote administration becomes more coherent
It is not a magic shield, but it is often cleaner than opening several admin ports or exposing internal web interfaces.
Benefits and drawbacks
Before configuring anything, it helps to be explicit about the trade-offs.
What this gives me
- remote access to the home LAN
- the ability to send all Internet traffic through the house
- a relatively lightweight setup on OpenWrt
- strong client support on Android, Linux, Windows, macOS, and iOS
- a reduced exposure surface with one UDP port
What I still have to accept
- I need to handle NAT / port forwarding on the ISP router
- if the public IP changes, I need DynDNS
- if the home uplink is weak, tunnel performance will be limited quickly
- full tunnel mode uses more battery on mobile and adds some latency
- a poor configuration can expose too much of the LAN
- troubleshooting is sometimes less intuitive than with one directly exposed service
In short: this is a strong approach for remote access, but it still requires deliberate network design.
High-level architecture
The logical layout looks like this:
Android / Other client
       |
       |  WireGuard (UDP)
       v
[ Internet ]
       |
       v
[ ISP Router Huawei HG8145X6 ]
       |
       |  forwards one UDP port
       v
[ OpenWrt Router MR8300 ]
       |
       +--> local LAN
       |
       +--> Internet exit through the OpenWrt WAN
The key point is that the OpenWrt router is not directly exposed at the Internet edge. It sits behind the ISP router, so I need at least:
- a UDP port forward from the ISP router to the OpenWrt WAN IP
- ideally a DHCP reservation or static WAN IP for OpenWrt on the ISP router
- a stable way to find the public IP, usually DynDNS
Recommended addressing plan
It helps to keep a clean separation between:
- the LAN subnet
- the VPN subnet
- the WAN addressing
Simple example:
- OpenWrt LAN:
192.168.10.0/24 - OpenWrt LAN IP:
192.168.10.1 - WireGuard network:
10.203.0.0/24 - WireGuard router IP:
10.203.0.1 - Android client:
10.203.0.2 - another client (optional):
10.203.0.3
This helps because:
- routing stays readable
- it avoids reusing a very common home subnet such as
192.168.1.0/24
I also prefer avoiding VPN ranges that commonly collide with local tooling defaults. For example:
- Docker often uses bridge networks in the
172.17.0.0/16range and nearby subnets - libvirt commonly uses
192.168.122.0/24 - VirtualBox host-only networks are often seen around
192.168.56.0/24
For that reason, I would rather choose a less common private /24 in 10.0.0.0/8, provided it does not already exist elsewhere in my environment.
If your home LAN uses a very common subnet, there is a real risk of overlap when you connect from another network that happens to use the same range.
Step 1: create the WireGuard interface in LuCI
In Network > Interfaces, create a new interface and select WireGuard VPN as the protocol.
I would simply call it wg0.
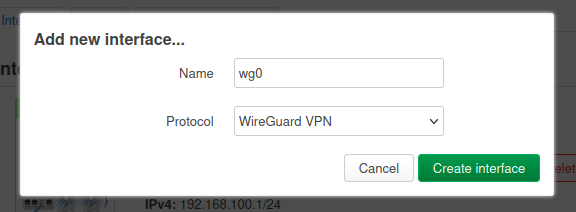
Creating the wg0 interface in LuCI and selecting WireGuard VPN as the protocol.
Note: if WireGuard VPN does not appear in the Protocol list, reboot the router after installing the three prerequisite packages:
kmod-wireguard,wireguard-tools, andluci-proto-wireguard.
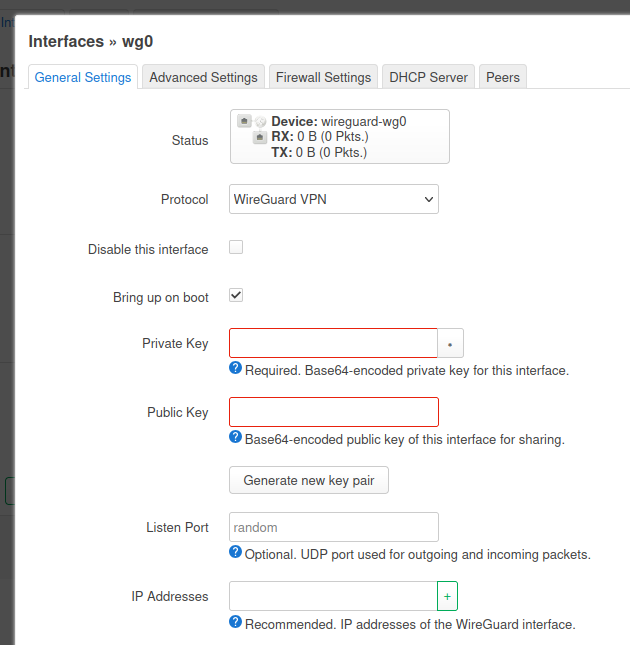
After creating the interface, LuCI opens the main WireGuard configuration screen for wg0.
To generate the router key pair in LuCI, I used the Generate new key pair button directly in the WireGuard interface settings.
The Generate new key pair button in the wg0 interface configuration.
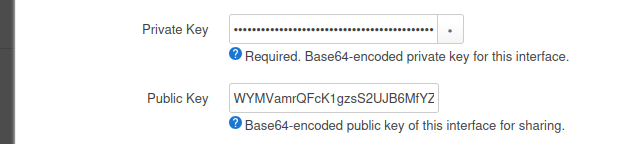
The wg0 interface after LuCI has generated a new WireGuard key pair.
At this stage, I set the main interface values:
- private key: generated by OpenWrt
If you prefer to generate keys from the command line, I can also do it with wg:
umask 077
wg genkey | tee privatekey | wg pubkey > publickey
This creates a privatekey for the interface private key and publickey for the peer configuration on the other side
If the setup is done entirely on OpenWrt through the shell, this is the simplest alternative to the LuCI button.
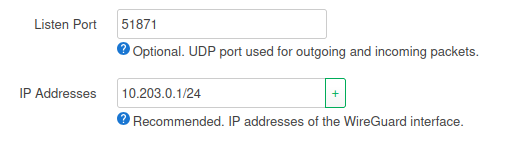
- listen port: use a non-default high UDP port, for example
32541/UDP
I avoid the default WireGuard port when exposing the service to the Internet. This is not a security boundary by itself, but it does reduce trivial background scanning and noisy reconnaissance on the default port.
- interface address:
10.203.0.1/24
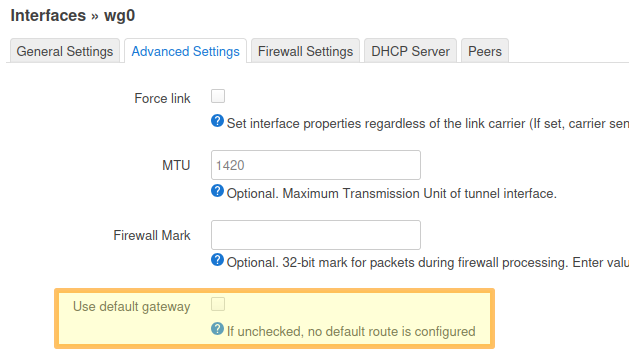
Another step is to disable the default gateway in the advanced settings of the interface. This option is useful only when OpenWrt itself is acting as a VPN client and must change its own default route through the tunnel, which is not the case in this server setup.
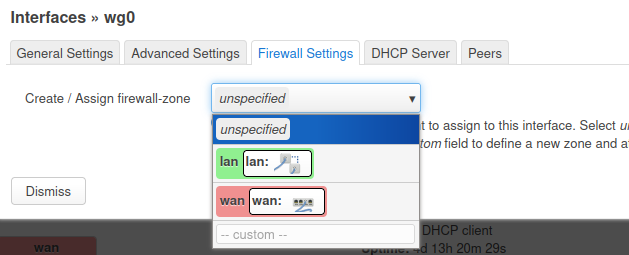
Regarding the Firewall Settings tab, at this stage I can only attach wg0 to an existing zone; in Step 2, I will create a dedicated vpn zone and show how to assign wg0 to it properly.
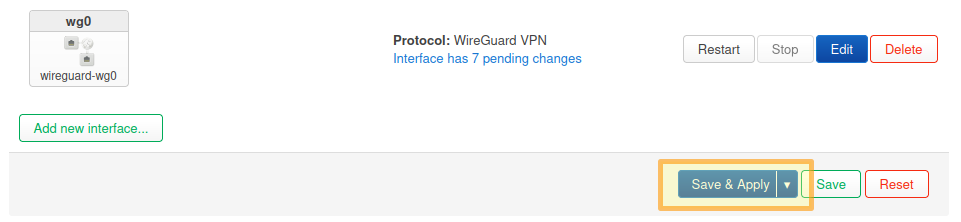
And you may now save the interface configuration:
Step 2: attach the interface to a firewall zone
This is a central step. A WireGuard interface without a clear firewall policy is not a finished configuration.
The clean approach is usually to create a dedicated zone, for example vpn, and explicitly define what it may reach.
Recommended approach:
- if using LuCI, go to
/cgi-bin/luci/admin/network/firewall - add a new
vpnzone (Addbutton at the bottom of the screen) - attach
wg0to it - set
input = ACCEPT,output = ACCEPT, andintra-zone forward = REJECT - keep masquerading disabled on the
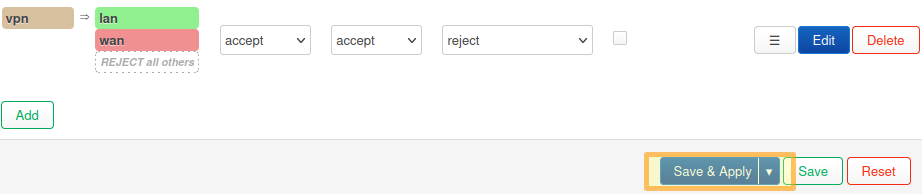
vpnzone (NAT stays onwan) - allow forwarding from
vpn -> lanand also forwarding fromvpn -> wansince I want full Internet routing
For this zone popup, the practical values are:
- Name:
vpn - Input:
accept - Output:
accept - Intra zone forward:
reject - Masquerading: unchecked
- MSS clamping: unchecked
- Covered networks:
wg0 - Allow forward to destination zones:
lanandwan - Allow forward from source zones: leave empty /
unspecified - Advanced tab: keep
Covered devicesandCovered subnetsempty, disableIPv6 Masquerading, and useRestrict to address family = IPv4 onlyfor an IPv4-only network
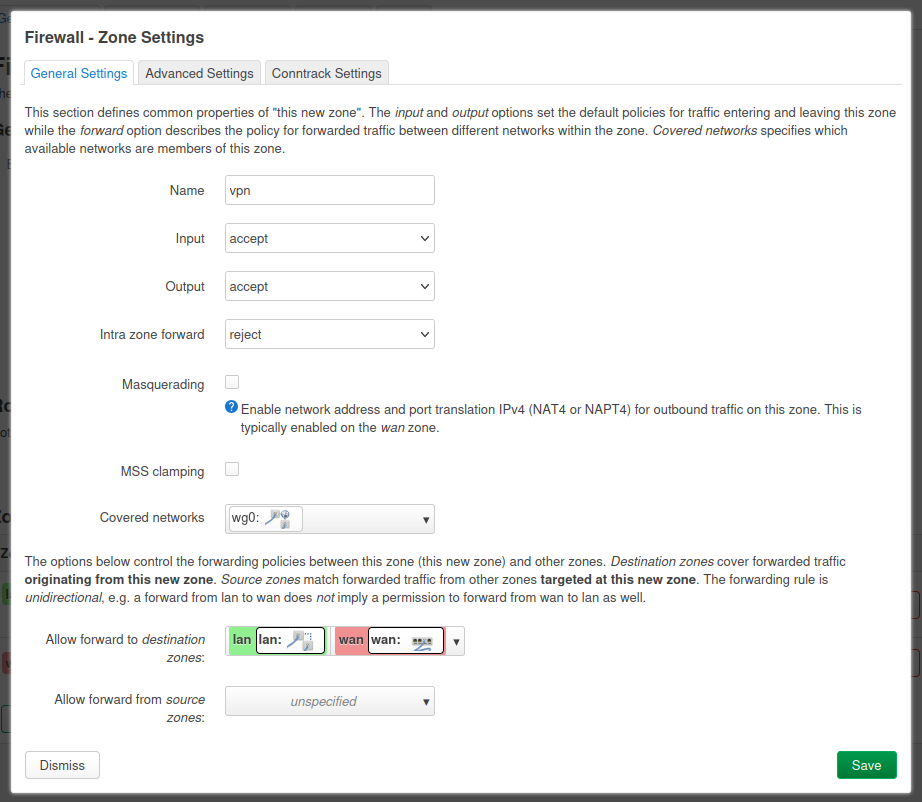
And you can now save the new zone:
Security note
If you do not need complete access to the whole LAN, you should not allow everything by default. The cleaner approach is to restrict access through:
- specific firewall rules
- network segmentation / VLANs
- limiting the reachable services
If the only goal is to administer a few devices, full LAN access may not be the right choice.
Step 3: allow the WireGuard port on OpenWrt
If the vpn zone is correctly linked, I still need to ensure that the router accepts incoming UDP traffic on the WireGuard listen port.
On OpenWrt, that is usually done through the WAN zone or a dedicated rule.
In Firewall > Traffic Rules, create a rule with:
- Name:
Allow-WireGuard-Inbound - Protocol:
UDP - Source zone:
wan - Destination:
This device(not thevpnzone) - Destination port:
32541 - Action:
Accept input - Advanced tab:
Restrict to address family = IPv4 onlyfor an IPv4-only setup
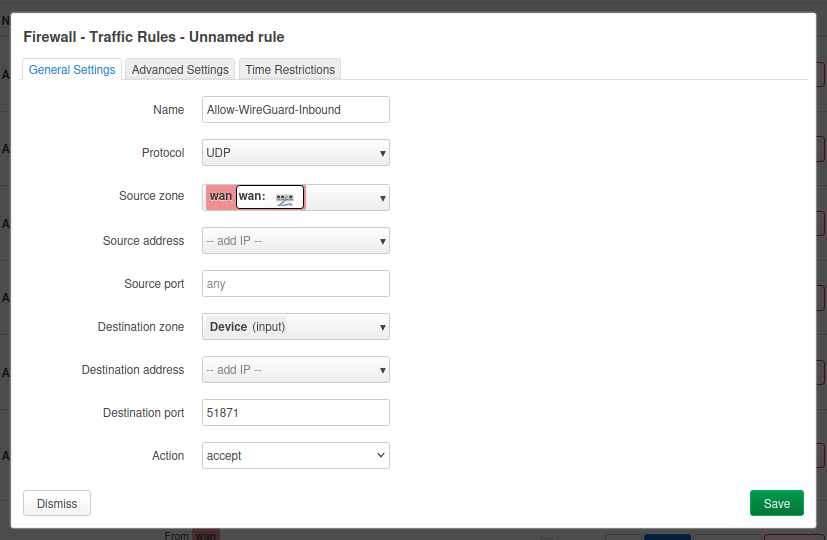
And in the same way than previous steps, save the configuration before moving forward with the next step.
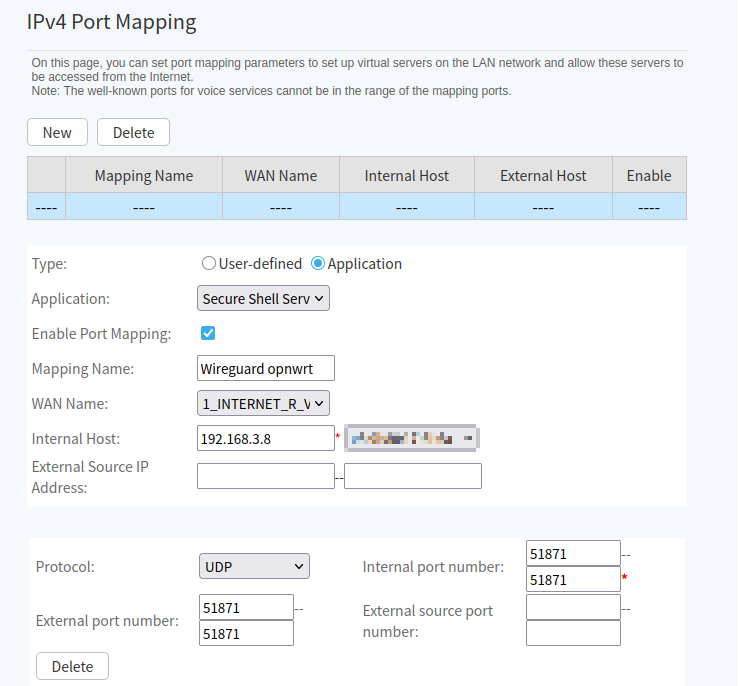
Step 4: forward the port on the ISP router
Because the OpenWrt router sits behind the ISP router, I now need to translate that on the ISP side. The idea is simple:
- the ISP router receives the traffic from the Internet
- it forwards
UDP/32541to the OpenWrt WAN IP
Recommended prerequisites:
- reserve the OpenWrt address in the ISP router DHCP and make sure that the address does not change
- make sure there is no conflicting rule or UPnP behavior interfering with the flow
On my ISP router, I configured port mapping with:
- Type: user-defined (or custom equivalent). On some ISP router UIs, port fields may only become editable under a specific profile; if so, select the profile that allows setting protocol and ports explicitly.
- Enable Port Mapping: enabled
- Internal Host: OpenWrt WAN IP (example:
192.168.3.8) - Protocol:
UDP - External port number:
32541to32541 - Internal port number:
32541to32541 - External source IP address: empty (unless I explicitly want to whitelist a fixed source IP, this is not my case)
Should I put the OpenWrt router in the ISP router DMZ?
Usually, no. For this use case, a targeted WireGuard port forward is cleaner than placing OpenWrt in a broad DMZ.
A DMZ can be useful for testing, but for a normal setup I would rather keep:
- a fixed OpenWrt WAN IP
- one targeted port forward
- the minimum exposed surface
Step 5: handle the public IP with DynDNS
If the ISP provides a static public IP, this is optional. But in many cases the public IP can change every 24 hours or after an ISP router reboot. Even with a fixed IP, I still prefer a stable DNS name because it avoids touching every client profile later.
In my case, I use my own domain and host DNS on Cloudflare. I made this choice because DynHost was not available in my registrar/manager context, so I migrated the DNS zone to Cloudflare and configured DDNS updates from OpenWrt. You might still be able to use your registrar’s DynDNS directly if it is available.
Target hostname example (I recommend choosing a unique subdomain name):
myprivatevpnXYZ.mmb.sh
Once the domain was migrated to Cloudflare, I followed these steps:
5.1 Create the WireGuard DNS record
In Cloudflare DNS:
- create an
Arecord formyprivatevpnXYZ.mmb.sh - set it to any placeholder IPv4 initially
- set Proxy status = DNS only (important for WireGuard UDP)
5.2 Create a restricted Cloudflare API token
Create an API token with least privilege:
- permission:
Zone - DNS - Edit - permission:
Zone - Zone - Read - zone resource: only
mmb.sh
Store this token securely. It is the secret OpenWrt will use for DDNS updates.
5.3 Install DDNS and CA packages on OpenWrt
opkg update
opkg install ddns-scripts luci-app-ddns ddns-scripts-cloudflare ca-bundle ca-certificates
Note that with the LuCI package, you will need to reboot OpenWrt.
5.4 Configure DDNS in LuCI
Once rebooted, in Services > Dynamic DNS, create a new service (IPv4):
- Service Name: for example
CloudflareDynDNS - DDNS Service provider:
cloudflare.com-v4
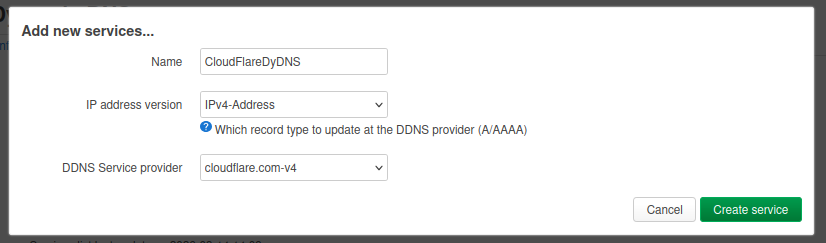
Then in the new popup that opens:
- Enable: checked
- Lookup Hostname:
myprivatevpnXYZ.mmb.sh - Domain:
myprivatevpnXYZ@mmb.sh(record@zone format) - Username:
Bearer - Password:
<Cloudflare API Token> - Use HTTP Secure: checked
- Path to CA-Certificate:
/etc/ssl/certs
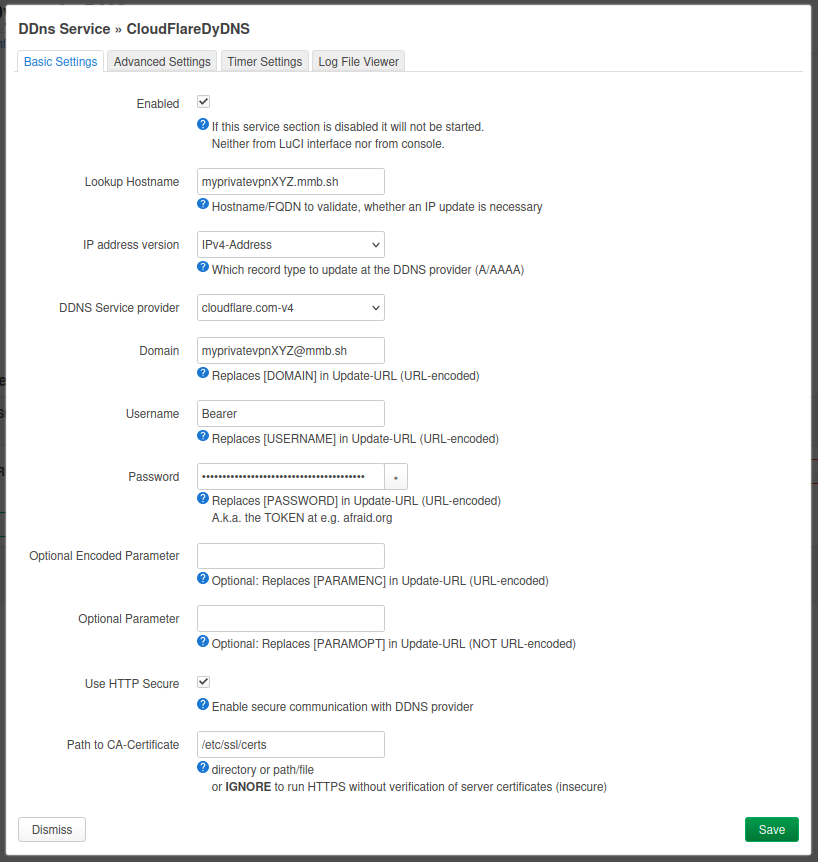
In the same DDNS service popup:
- Advanced Settings
- if OpenWrt is directly connected to the Internet with a public WAN,
IP address source = NetworkandNetwork = wanis fine - if OpenWrt is behind an ISP router (private WAN like
192.168.x.x), such as in my case, then useIP address source = URL(orWeb) to detect the real public IPv4 - for URL/Web detection, use a reliable IPv4 endpoint such as
http://checkip.amazonaws.comorhttps://api.ipify.org - keep
DNS-Serverempty unless you have a specific reason to override it - if
Lookup Hostnameresolves to a private IP in logs (for example192.168.x.x), set a public resolver explicitly (for example1.1.1.1) inDNS-Server - optional: keep
Log to fileenabled for troubleshooting
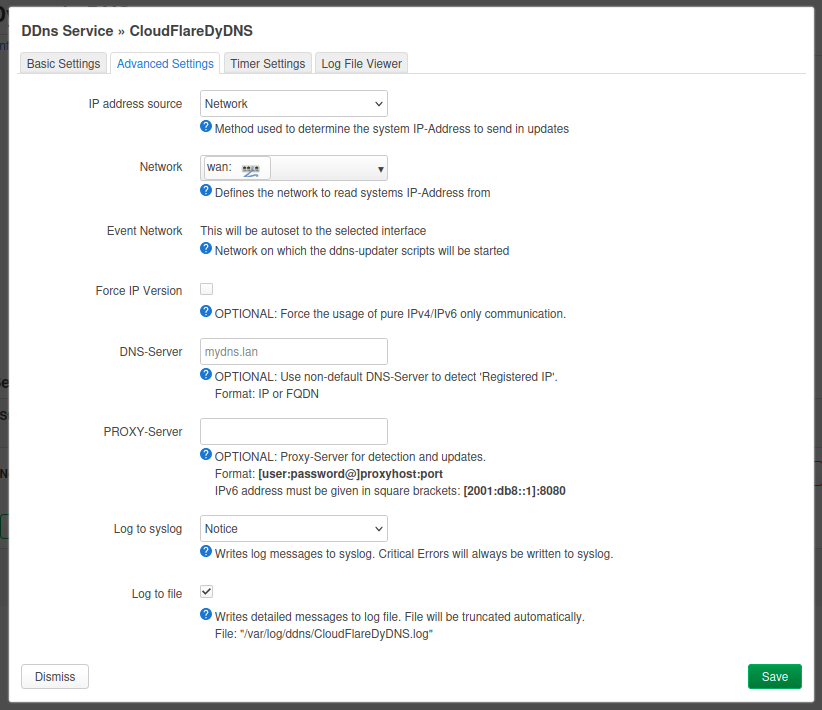
- Timer Settings
- set
Check Interval = 5andCheck Unit = minutes - set
Force Interval = 72andForce Unit = hours - set
Error Retry Interval = 60andRetry Unit = seconds - keep
Error Max Retry Counter = 0(unless you want a different retry policy)
Then save and start the service.
If Cloudflare DDNS authentication fails, jump to troubleshooting where both auth formats are summarized.
5.5 Validate updates
You can see the status after clicking “Reload” and checking the logs in the tab Log File Viewer. But you can also try these useful checks:
nslookup myprivatevpnXYZ.mmb.sh 1.1.1.1
logread -e ddns
If the value returned by nslookup matches the current public IPv4, DDNS is working.
DynDNS and CGNAT reminder
DynDNS only solves name-to-IP updates. If I am behind CGNAT, inbound WireGuard may still fail even with perfect DDNS. In that case, I need another strategy (public IP option, VPS relay, or outbound tunnel design).
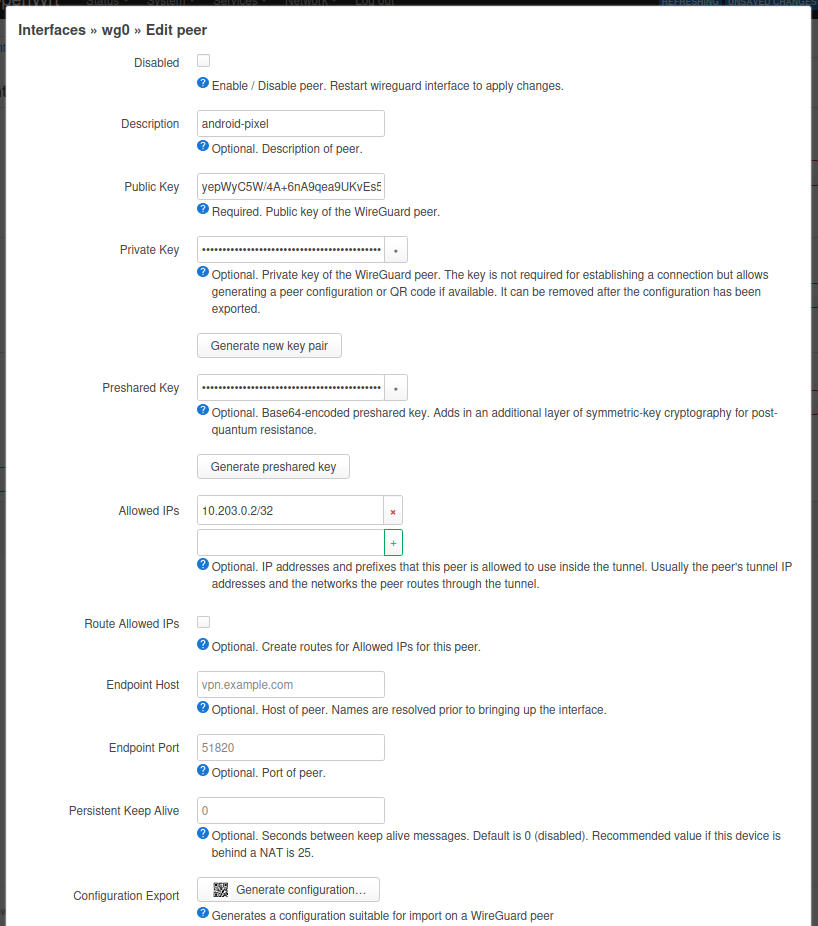
Step 6: create the peers on OpenWrt
Go back to your wg0 network interface configuration. In the Peers tab, you will be able to add peers that will be allowed to connect to the VPN.
Each client should have:
- its own key pair
- its own VPN address
- its own peer entry on the router
I strongly recommend:
- one key pair per device
- one peer per device
- never sharing one profile across multiple devices
Important distinction:
- On OpenWrt peer settings,
Allowed IPsidentifies which tunnel IP belongs to that peer (for example10.203.0.2/32). - On the client profile,
AllowedIPsdefines which destination traffic goes through the tunnel (for example full tunnel vs LAN-only).
Android peer
Simple example:
- name:
android-pixel - generate a key pair (button in the interface)
- allowed IPs for that peer, for example
10.203.0.2/32
Security note
On the router side, Allowed IPs for a peer do not only define destinations. They also define which VPN address belongs to which client.
If this is configured too broadly or inconsistently, routing becomes harder to reason about and mistakes become easier.
Step 7: configure the Android client
On Android, the official WireGuard app is usually the simplest option:
From the OpenWrt peer page:
- fill and save the peer first
- click Generate configuration…
- scan the generated QR code from the Android WireGuard app
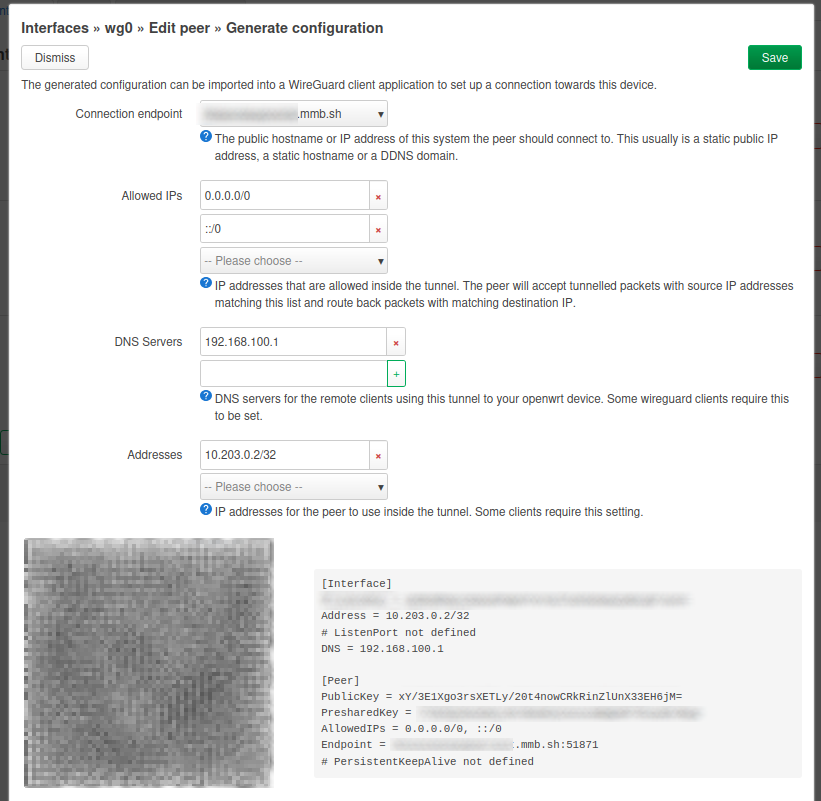
The generated profile should include:
Address = 10.203.0.2/32Endpoint = <your-ddns-hostname>:<your-wireguard-port>AllowedIPs = 0.0.0.0/0for IPv4 full tunnel- optional
AllowedIPsaddition:::/0only if IPv6 is actually routed through your tunnel DNS = <resolver reachable through the tunnel>(for example192.168.10.1if clients can reach router LAN DNS, or10.203.0.1if you explicitly expose DNS on the WireGuard interface)- optional
PersistentKeepalive = 25for mobile NAT stability
In a full-tunnel case, AllowedIPs = 0.0.0.0/0 sends IPv4 Internet traffic into the tunnel.
On Android, enable the tunnel. Then, while disconnected from your home Wi-Fi (for example on mobile data), verify that your public IP matches your home public IP.
Android-specific considerations
If I keep a permanent full tunnel enabled, I want to watch:
- battery life
- behavior when switching between Wi-Fi and 4G / 5G
- apps that behave differently when the apparent public IP changes
In some cases, having two profiles makes sense:
- one “LAN only” profile
- one “full tunnel” profile
Step 8: configure other devices (same principle)
For other clients (Linux, Windows, macOS, iOS), the process is almost the same:
- create a dedicated peer on OpenWrt (one key pair and one tunnel IP per device)
- export or manually copy the client configuration
- set the same endpoint hostname/port and matching keys
- choose
AllowedIPsbased on your goal (LAN-only vs full tunnel) - test handshake and traffic before considering the setup finished
The UI differs by platform, but the WireGuard logic stays identical.
Tests to run before calling the setup done
I would not stop at “the tunnel connects”.
At minimum, I would verify:
- that the WireGuard handshake appears on the router
- that the client can reach
10.203.0.1 - that it can reach the LAN, for example
192.168.10.1and then an internal host - that Internet traffic really exits through the house
- that DNS resolution is coherent
- that reconnection works after a mobile or Wi-Fi network change
Common issues and troubleshooting
There are often no explicit errors when the connection fails. You may only notice that Internet access is not working on the client. If the tunnel does not establish:
- verify endpoint hostname and UDP port in the generated profile
- verify OpenWrt listen port and firewall rule use the same port
- verify the peer public key on OpenWrt matches the phone key pair
- save the peer before generating the QR code
- if still failing, regenerate the peer and export/scan a fresh QR code
In my own troubleshooting, points 4 and 5 were exactly what fixed the issue.
No handshake at all
If the peer never handshakes, I would verify:
- the public endpoint and UDP port
- the port forward on the ISP router
- the OpenWrt firewall rule allowing inbound UDP traffic
- whether the home connection is behind CGNAT
- whether the client is using the correct public key for the router
Handshake works, but I cannot reach the LAN
If the tunnel comes up but the LAN stays unreachable, I would check:
- the
vpn -> lanforwarding rule - the peer
Allowed IPson OpenWrt - the LAN subnet used in the client config
- whether the LAN overlaps with the network I am currently connected from
LAN works, but Internet does not go through the tunnel
If internal access works but public traffic still exits locally, I would check:
- whether the client uses
AllowedIPs = 0.0.0.0/0 - whether
vpn -> wanforwarding is allowed - whether masquerading/NAT behavior is correct on the router
- whether DNS is still pointing to an external resolver instead of the home side
DNS works poorly or leaks outside the tunnel
If websites open inconsistently or DNS does not follow the tunnel, I would verify:
- the
DNSvalue in the client config - whether the chosen DNS server is reachable through the tunnel
- whether Android is overriding DNS behavior
Cloudflare DDNS authentication mismatch
If DDNS fails at Cloudflare authentication, check logs to identify the expected mode:
- If logs show
Authorization: Bearer ..., use the token-based format expected by your installed DDNS provider implementation (in my case:Username = Bearer,Password = API Token,Domain = record@zone). - If logs show
X-Auth-EmailandX-Auth-Key, use legacy mode (Username = Cloudflare email,Password = Global API Key,Domain = zone).
The tunnel works from Wi-Fi but not from mobile data
That usually points to NAT behavior, filtering, or a stale endpoint path. In that case I would test:
PersistentKeepalive = 25- another external network
- whether the ISP router or mobile carrier filters unusual UDP flows
IPv6 note
The example client profiles include ::/0 in AllowedIPs, which is appropriate only if I actually want IPv6 traffic to follow the tunnel as well.
In practice, I should decide this explicitly:
- if my setup supports IPv6 end to end, I can keep
::/0 - if my home network does not properly route IPv6 through WireGuard, I should remove
::/0rather than pretend IPv6 is covered
Security practices I would recommend
If I wanted to harden this setup, I would prioritize:
- one key pair per device and immediate revocation if a device is lost
- a VPN subnet distinct from the LAN
- firewall rules limited to the real need
- disabling UPnP if it is not required
- regular OpenWrt updates
- exported backups of the router configuration
- careful thought about administrative interfaces exposure
- verifying that IPv6 is either correctly routed or intentionally excluded
Reference documentation
For exact implementation details and ongoing updates, I would also keep these references nearby:
- WireGuard Quick Start
- OpenWrt documentation
- OpenWrt WireGuard package page
- OpenWrt Dynamic DNS client
- Cloudflare API tokens
Why not Tailscale or ZeroTier?
This setup is specifically about running a self-managed WireGuard server on OpenWrt. Tools such as Tailscale or ZeroTier or equivalent can be easier to deploy because they simplify NAT traversal and device enrollment.
I still prefer this OpenWrt + WireGuard approach when I want:
- direct control over the router-side configuration
- no dependency on an overlay control plane
- a predictable path for full-tunnel routing through the house
- a setup that stays close to standard WireGuard behavior
If the priority were only “make remote access work quickly”, Tailscale would be worth considering. If the priority is a router-centric setup I understand end to end, WireGuard on OpenWrt is a better fit.
Conclusion
Running WireGuard on OpenWrt behind an ISP router is entirely realistic, including in a typical home setup. The hard part is usually not the protocol installation itself, but the surrounding design:
- clean addressing
- coherent firewalling
- well-understood port forwarding
- realistic handling of the public IP
- a clear distinction between LAN access and full Internet routing
For my use case, this is cleaner than exposing internal services one by one, and more flexible than relying on a handful of published ports.
Before calling this setup finished, I would validate four things from outside the home network: the real handshake path, LAN reachability, full-tunnel Internet routing, and whether the VPN exposes more administrative surface than intended.